Most of you have heard about creating a Live Linux USB. Its purpose is to boot a Linux distribution from USB, try it, and then install it on your computer. The problem with this process is that all the changes you make, those changes will not not appear, on the USB Linux distribution, when you reboot .
In this guide we will try to install a Persistent Linux distribution that works entirely from USB, and will retain all our changes, such as new programs and applications we install, changes on the interface and the appearance, and creating folders and files.
Advantages
The advantages of this process are plenty.
First of all, we can maintain a complete operating system on a USB that can work on any computer we want.
It is an excellent tool for novice users who want to try and experiment with Linux without having to install a distribution on their computer. This way we avoid creating Dual Boot computers before we become familiar with the new operating system.
Excellent tool for tasks requiring increased safety. Keeps security passwords for financial transactions, Browser history along with security passwords, emails, and files.
Tools
There are many ways and procedures that we can use. In the future we will publish other guides to create Bootable Live Persistent Linux USB. In this guide we will use the Universal USB Installer.
You can download the program HERE
Then choose one of the various Ubuntu Linux-based distributions (flavors). For this guide I chose Kubuntu. A simple and fast distribution that comes with almost as many programs as the average user needs.
We download Kubuntu distribution in .iso format from HERE

Preferably choose 64-bit unless you intend to use it on a fairly old computer.
The process
Quite simple and fast. We start Universal USB Installer.
In License Agreement click I Agree

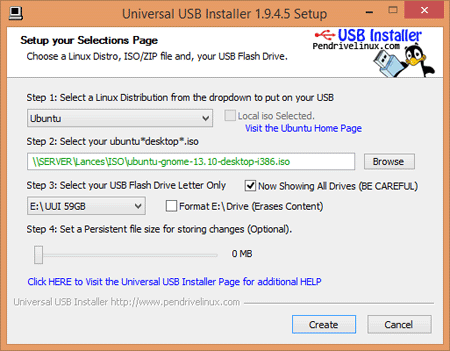
In Step 1 we have to choose Distribution (Distro) from the Drop Down Menu. In our case I chose Kubuntu

Next at Step 2 we select Browse

It will open a window through which we should go to the folder that we have stored the Linux distribution. The program will show us the Kubuntu distributions. I chose the 64-bit version. Then press Open

We move to Step 3. Here we will first choose the USB we want to install our Linux Distro. I chose a simple USB Sandisk 8GB. You need to make sure you chose the right Drive (Do not delete a storage unit which contains something important)

Right next to the USB option we select the Fat32 Format of USB. I want a small installation with a Persistent file of less than 4GB. Otherwise, it may have required NTFS Format
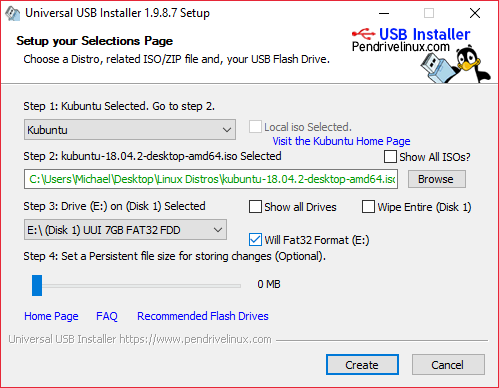
Then proceed to select the size of Persistent File. This is the file that records the changes that are made and will keep them after every Reboot. I choose 2GB, about as much as the Ram on the system that I want to run the new operating system. We have completed our settings and we only need to click Create and start the procedure.

The program will open a window with a summary of our choices. If everything agrees with our choices, we proceed by choosing Yes

From now on everything is done automatically.

The program will extract the .iso file from the Linux distribution to a temporary folder on our hard drive and will gradually install it on the USB
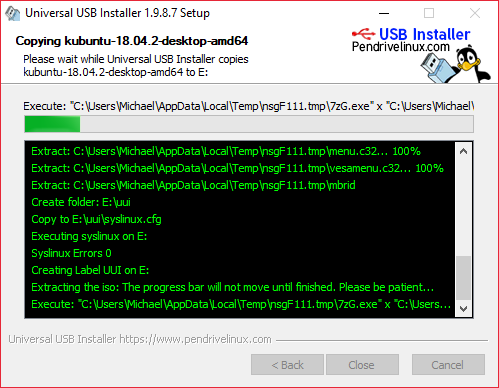

It will then create the Persistent File and copy it to USB.


After 10-12 minutes, depending on the distribution you choose and the size of the Persistent File, we will see Process is Complete! Click Close and you can remove the USB. It’s ready to run on any computer we want.

I choose to run it on a Toshiba Celeron with 2GB Ram, forgotten on the shelf for years. I place the USB into a port and start the computer by holding down F12 to enter the system’s Boot Menu. How to get into the Boot Menu may vary depending on the computer manufacturer and model. Usually one of F12, F9 or ESC when we start the computer, will do the job. If you are not sure, just search the internet for the model you have at your disposal.
I see the SanDisk USB available in the Boot Menu and I choose it

We see the system start with Kubuntu. All we have to do is choose Try Kubuntu. This will be selected at each reboot and the persistent file will be responsible for updating any changes we have made.

All you need to be careful is not to Update System or kernel. But you can update programs, install new ones, and customize your system as you want. Excellent tool for experimenting and familiarizing with Linux, without the need to install and create a Dual Boot system or use VM.
Protect your privacy without losing connection speed with a trustworthy VPN service like IPVanish. Find the plan meeting your needs here